Recording a Zoom Meeting
Your Zoom meeting can be recorded either manually or automatically. It can be recorded in the cloud or locally. All users have the local recording option enabled.
Record a Meeting Manually
- Start a Zoom meeting as the host.
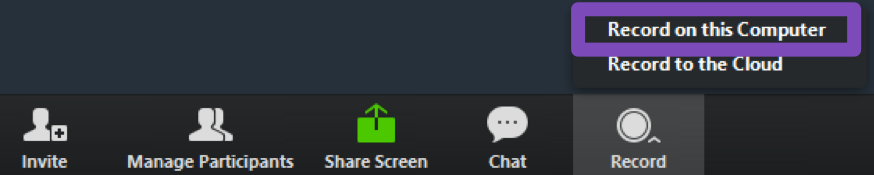
- Click the option to Record.
- Select Record on this Computer.
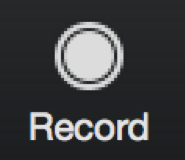
Hosts will see the following recording indicator in the top-left corner while the recording is active.
Participants will see the following indicator in the top-left corner while the recording is active.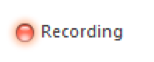
- Remember to stop recording at the conclusion of the meeing in order reduce the size of the recording.
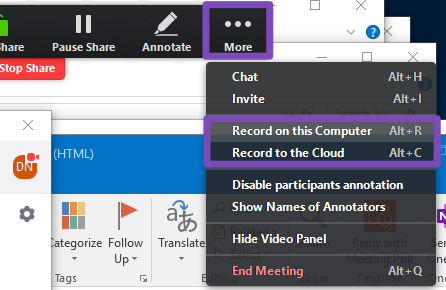
- Note that if you have started sharing content recording controls are found in the
"... More" menu
- For more information: https://support.zoom.us/hc/en-us/articles/201362473-Local-Recording
- NOTE: Due to limited space on our Zoom Cloud, please create a local recording when possible.
- You may choose to create a Cloud recording if:
- You need to access the recording from another computer.
- You want a transcript of the meeting.
- You want an audio only recording of the meeting.
- Note: please download your Cloud recordings once they are completed and then delete them from the Cloud. See this for instructions: tutorial-recording.aspx#migratecloudrecordings
- For information on recording layouts: https://support.zoom.us/hc/en-us/articles/360025561091-Recording-Layouts
Back to Zoom Documentation Homepage
Record a Meeting Automatically
- Go to My Meetings.
- Click on Schedule a Meeting or select the meeting topic from the list of Upcoming Meetings and click Edit this Meeting.
Note: You can also select your PMI by clicking on the Personal Meeting Room tab.
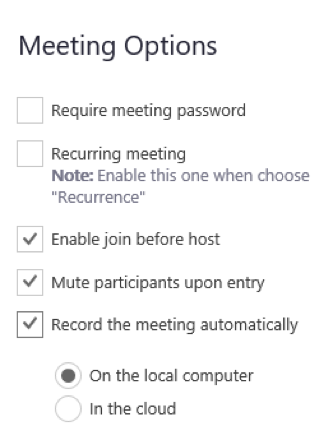
- Under Meeting Options, check Record the meeting automatically.
- Choose whether to record locally or in the cloud.
- NOTE: It is recommended that you use the “On the local computer” option since cloud space for Zoom recordings is limited.
- Click Save.
- For more information: https://support.zoom.us/hc/en-us/articles/202921119-Automatic-Recording
- For information on recording layouts: https://support.zoom.us/hc/en-us/articles/360025561091-Recording-Layouts
Back to Zoom Documentation Homepage
Finding, Viewing, and Managing Your Recordings
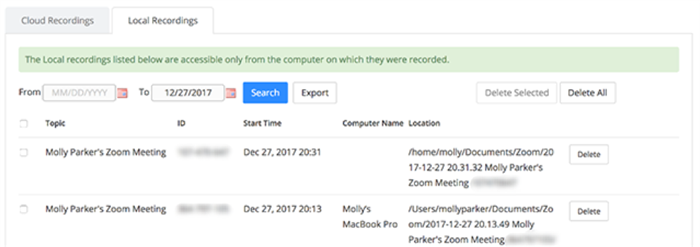
For local recordings, follow these steps
- Log in to the Zoom web portal.
- Navigate to My Recordings and click the Local Recordings tab.
- This will display the meeting topic, meeting ID, date and time, computer name, and
file path for the recording.
- Click Delete to remove a recording from the list.
- Note: You will need to remove the file from your local computer to delete the recording.
Back to Zoom Documentation Homepage
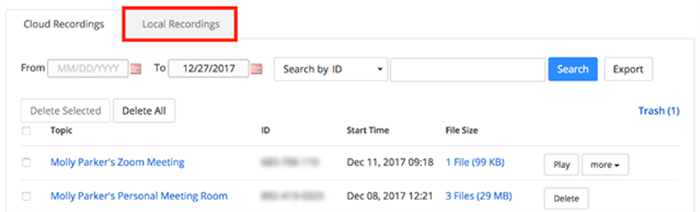
For cloud recordings, follow these steps
- Log in to the Zoom web portal and navigate to My Recordings.
Note: If your meeting has not finished converting, the recording will show in the list with a Processing Recording label. Once the recording has finished converting, you will be able to view, share, download or delete your cloud recording.
- Click the meeting topic to display the available file types of the recorded data,
based on the settings you have enabled:
- Shared screen with speaker view: MP4 file with audio and video showing both active speaker view and shared content.
- Shared screen with gallery view: MP4 file with audio and video showing both gallery view and shared content.
- Active Speaker: MP4 file with audio and video showing the active speaker view only.
- Gallery View: MP4 file with audio and video showing the gallery view only.
- Shared Screen: MP4 file with audio and video showing the shared screen only.
- Audio only: M4A file with a recording of the audio.
- Audio transcript: VTT file with a transcript of the audio only.
- Chat file: Text file with the transcript of in-meeting chat.
- Click a file to play the recording or see the text of the chat. You can also download, share, or delete recordings.
- For more information: https://support.zoom.us/hc/en-us/articles/203741855-Cloud-Recording#h_92b66c0f-84d7-4385-b9c8-cb46d8e9267c
Back to Zoom Documentation Homepage
Recording Transcripts
- Use the Audio transcript option (under Cloud Recording) to automatically transcribe the audio of a meeting
or webinar that you record to the cloud. After this transcript is processed, it appears
as a separate .vtt text file in the list of recorded meetings. In addition, you have
the option to display the transcript text within the video itself, similar to a closed
caption display.
- NOTE: Transcripts can only be made of cloud recordings.
- For more information: https://support.zoom.us/hc/en-us/articles/115004794983-Automatically-Transcribe-Cloud-Recordings-
Back to Zoom Documentation Homepage
Migrate Cloud Recordings to Local Storage (Download and Delete Cloud Recordings)
-
Cloud storage is limited. We recommend that if you record Zoom meetings to the cloud that the meetings be migrated to local storage to conserve available cloud storage.
-
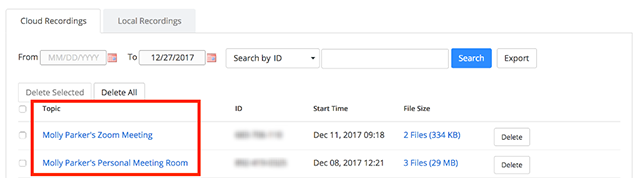
Navigate to Recordings.
-
You will see a list of cloud recordings on your account.
-
Find the recording you want to download and select the topic.
-
-
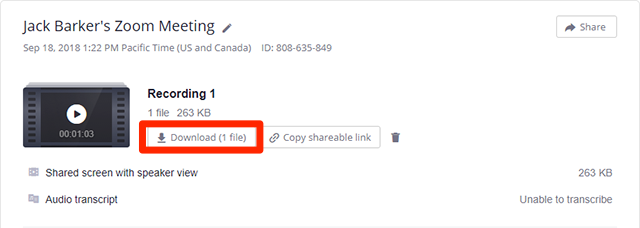
This will pull up a list of the recording files.
-
Select the "Download" button next to the file you want to download.
-
-
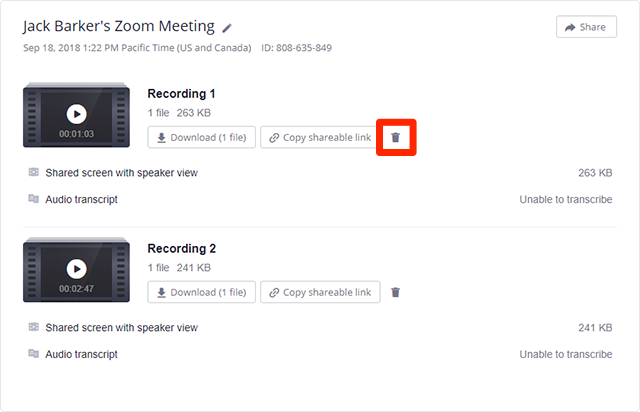
After the file is downloaded, select the trash icon to delete the cloud recording.
-