LSU Health New Orleans Template
Best Practices
- Accessibility
- Web Video
- Optimizing Images for the Web
- Optimizing PDFs for the Web
- Creating a Link That Expands a Particular Submenu
- Email Addresses
- Title Bar
- CSS
- Widths of Objects Using Responsive Design
- Tables
- Designing With Columns Using DIV
- Removing the Menu
- File References
- Department Header Information
- Social Media Widgets
- Create A Button
Accessibility
LSU Health New Orleans recommends following the WCAG and Section 508 accessibility standards as closely as possible in order to provide more accessible web content for individuals with disabilities. Use this link to learn about creating accessible web pages.
Web Video
If you would like to link to or embed video on your web page we request that you use one of the following solutions:
YouTube
YouTube should be utilized if a video is for public consumption and does not need to reside within LSUHSC infrastructure. Please contact Webmaster if you are interested in uploading videos to YouTube. Once your video is uploaded you would be able to copy the VideoID and use the embed code as shown below to place the video inside of the CMS.
Mediasite
Mediasite is a video hosting solution hosted by LSU Health New Orleans. This solution should be used when a video needs to be locked down so that only certain groups of user can view the content, or if the video needs to be hosted on internal resources. Contact EnterpriseAVGroup@lsuhsc.edu to use this video solution.
A note on Accessibility (Closed Captioning)
Videos should include closed captions to enhance accessibility.
- YouTube has built in tools to add closed captioning to videos. You can find information
on how to add, edit and review closed captions in YouTube here: http://support.google.com/youtube/topic/3014331?hl=en&ref_topic=4355241
- If you are not using YouTube, there are ways to add closed captions to videos using
video editing software such as
- Adobe Premiere.
- Third-party services, such as https://www.rev.com, that will provide closed captions for a fee.
If you have any questions please send your request to Webmaster.
Embedding Videos
Copy the following code into the "Source" view of a CMS editor in order to embed a video. The code will allow the video to scale responsively. Replace VIDEOID with the video id from the video's URL. For example, the VideoID for https://youtu.be/3LGnHrQHgc4 is 3LGnHrQHgc4
YouTube
<div class='embed-container'>
<iframe frameborder="0" height="420" src="//www.youtube.com/embed/VIDEOID?rel=0" width="700">&#160;</iframe>
</div>
<div class="clear"> </div>
MediaSite
<div class="embed-container">
<iframe frameborder="0" height="320" marginheight="0" marginwidth="0" scrolling="auto"
src="//mediasite-ent.lsuhsc.edu/Mediasite/Play/VIDEOID?autostart=true" width="640">&amp;amp;#160;</iframe>
</div>
<div class="clear"> </div>
Optimizing Images for the Web
It is important to optimize images for web viewing. Optimized image files save room on web servers and decrease web page load times.
Web Optimized Image Guidelines
Image Formats
- Acceptable image formats:
- JPG
- GIF
- PNG
Image Resolution
- Images should be set to 72 ppi (pixels per inch)
Image Size
- Images should be saved as the same size that they are set to display on the web page
- For example an image that is set to display with a width of 500px should be saved as a 500px image on the web server.
Aspect Ratio
- An image's aspect ratio should always be maintained.
- Maintaining aspect ratios keeps images from looking stretched/skewed on the web.
Tools for Optimizing Images
There are many services and programs that can be used to optimize images for the web.
- A website that will optimize your .png or .jpeg images for you (https://tinypng.com/)
- A photoshop plugin which will optimize .png images (http://www.fnordware.com/superpng/)
Create a Link That Expands a Particular Submenu
In order to have a CMS page automatically open a sub menu when a particular page is loaded the link needs to be appended with " ?submenuheader=0" The 0 would modified according to the number of submenus on the CMS page. The first sub menu on the page would be "0", the second sub menu would be "1", and so on. Example: (This link opens the IT web site with the first sub menu expanded)
Optimize PDFs for the Web
It is important to optimize PDFs for web viewing. Optimized PDF files save room on web servers and decrease web page load times.
How to Optimize a PDF for web (Using Adobe Acrobat Pro)
- File > Save As >Optimized PDF
- From here choose "Audit space usage.." (top-right) to find out exactly what is taking up the most space
- Use the options located in the PDF Optimizer to optimize the PDF based on the information retrieved from the audit
- Press OK and choose a location to save the file
Additional Tips for Optimizing PDFs
-
Optimizing images
-
It is important to note that large images inside a PDF are often the cause of large PDF files. It may be necesary to go through and resize these images individually to get the best PDF optimization results.
-
-
Avoid using several different fonts
- Each font that is used in a PDF adds additional data to the PDF file. In order to get a smaller file size, use a limited number of fonts.
-
Recognize Text
- When working with scanned PDF documents, recognizing document text allows users on
the web to search the documents in browser.
- In Adobe Acrobat select (In the right panel) Tools > Recognize Text > In this File
- Following this Adobe Acrobat will scan the text.
- Be sure to save the PDF after this process is finished.
- When working with scanned PDF documents, recognizing document text allows users on
the web to search the documents in browser.
Email Addresses
One of the best methods that spammers use to get email addresses is to parse web pages for email addresses. This includes the aspx code as well as the presentation, meaning if you hide the address but still link to it, they can still get the address. Our CMS has been updated to include obfuscation through JavaScript. This will provide a layer of protection for email addresses included by our CMS Editors. In order to further hide the address, after adding an email address which becomes linked and submitting the edit, edit again, then just change the text inside the text editor without double-clicking the address to pull up a dialog box.
Title Bar
Be sure to update the Title of each page to give users and accurate description of what the page is. This will show up in searches both on the website and from external search engines. When viewing the HTML tags, the title bar text can be set by editing the text between <head><title> and </title></head>.
In Visual Studio.Net (VS.NET), this can be edited by opening the properties window, selecting DOCUMENT, and editing the title attribute.
In Microsoft Expression, this can be edited by right-clicking on the page and selecting Page Properties. A dialog box will appear with options to change including the Title. It can also be changed when doing a Save As. The Save As dialog box presents a button entitled Change Title.
CSS
When building pages in the CMS, these tips should be followed to take advantage of style templates:
- If the page has font tags, remove them
- Remove any style= attributes in span or div tags, possibly remove the whole tags
- Remove align attribute from p tag
- Headings should use the heading tags
-
H1
-
H2
-
H3
-
H4
-
- Paragraphs should be surround by the p tag instead of formatted using the br tag
- It may be easiest to start with a fresh template page and copy the content into notepad before copying it into the web page.
The following tags are formatted with CSS:
- Body: font, color
- p, ul, ol, table: font, color
- p: justification
- a: color, text-decoration
- h1, h2, h3, h4: size, color
Benefits of using this:
- Maintains consistency throughout the site
- Eliminates having to set styles for every item on a web page
- When the style sheet is changed, everything relying on the sheet is changed at the same time
- Shrinks bloated pages, saving bandwidth and time
Please note that when formatting in this way, not all editors will show you what the results will be on the server. The only way to see the results is to load the actual web page from the webserver.
CMS pages using responsive design will have three local css files:
- style.css - This is used for styling objects the same no matter what the size of the browser
- style-large.css - This is used styling objects only for the larger desktop screens
- style-small.css - This is used for styling objects only for smaller mobile screens
Widths of Objects Using Responsive Design
As an example of the effect of CSS styling on objects, use the images on the home page at http://www.lsuhsc.edu under Events and Campus Resources.
The code to include the box and images is here:
<div class="BodyBoxEvents2014" id="BodyBoxEvents2014">
<div class="BodyBoxTitle2014">Events and Campus Resources</div>
<a href="/events/"> <img alt="Upcoming Events" src="/Template2015/images/home-upcomingevents.png"/></a>
<a href="/administration/chancellor/"> <img alt="LSUHSC Accreditation" src="/Template2015/images/Chancellor90.png"/></a>
<a href="/administration/vcacsa/emergency.aspx"> <img alt="Campus Police" src="/Template2015/images/lsuhscbadge90.png"/></a>
<a href="/administration/ocp/hotlines.aspx"> <img alt="LSUHSC-NO Hotlines" src="/Template2015/images/hotline90.png"/></a>
<a href="/regionalaccreditation/"> <img alt="LSUHSC Accreditation" src="/Template2015/images/SACSCOC90.png"/></a>
</div>
Here is the CSS used to style the images:
.BodyBoxEvents2014 a img {
min-width: 90px;
}
As you can see when viewing http://www.lsuhsc.edu/, as the browser size is reduced, the images will fall to the next row.
If we change the CSS to this:
.BodyBoxEvents2014 a img {min-width: 50px;max-width: 90px;}
The images will start at 90px, then as the browser's width is reduced, the images shrink. When the images are all at 50px, the images then begin to fall to the next row.
Tables
The historical way to control the placement of items was to use tables. Current best practice is to use span or div tags and use CSS to style the content. Tables are still ok to use as long as they are used to store tabular data. Tables should be avoided when styling content. This allows a page to remain responsive.
In order create a DIV element in the CMS you can use the new GUI button which looks like this:

Designing With Columns Using DIV
In order to allow a page to remain reponsive when designing a page with columns, we recommend using DIVs with particular classes.
To display columns using DIV tags, copy the code below for either a two or three column layout and paste into the "Source" view of a CMS content editor. Then turn off Source view and, using the normal editor, replace the word “Content” with the text you wish to appear in each column:
Two Column Layout
<div class="Twocol-1">
<p>Content</p>
</div>
<div class="Twocol-2">
<p>Content</p>
</div>
<div class="clear"> </div>
Three Column Layout
<div class="Threecol-1">
<p>Content</p>
</div>
<div class="Threecol-2">
<p>Content</p>
</div>
<div class="Threecol-3">
<p>Content</p>
</div>
<div class="clear"> </div>
Or use the method below to add columns using the "DIV" button in the CMS:
- Two columns can be setup in the CMS by highlighting the first column content, then
selecting the <div> button, then giving the first column the classes value Twocol-1. Then
highlight the second column content, select the <div> button, then giving the
second column the classes value Twocol-2.
- In order to allow the rest of the content to continue back at the left side of the
page, be sure to include <div class="clear"> </div> after the last column
section.
- Three columns in the CMS can be setup in much the same way as two, except using the class names Threecol-1, Threecol-2, and Threecol-3 for the three columns. Please note that the CSS classes are case sensitive.
For an example of how the columns look, see the sample Columns page.
Removing The Menu
If you would like to create a site without a menu, please contact Web...@lsuhsc.edu.

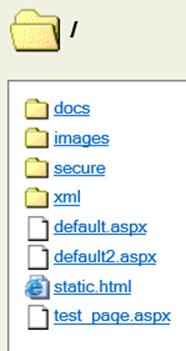
File References
Files can be referenced as either absolute or relative paths.
- Relative Paths
- /template2015/images/LSUHealthNO15.png
- If images are left in same place, reference works when page is moved
- This initial slash references the root of the website
- This is the method used by the CMS
- ../../../template2015/images/LSUHealthNO15.png
- Must be used by users who have different paths in development and production
- ../ references previous directory
- path/path/image.jpg
- This references items in subfolders
- When an application is moved from development to production, references continue to work
- /template2015/images/LSUHealthNO15.png
- Absolute Paths
- http://www.lsuhsc.edu/template2015/ images/LSUHealthNO15.png
- NOT Recommended
- When moved to production, references will need to be updated on all pages
- Even if same website, performance will not be as good
- http://www.lsuhsc.edu/template2015/ images/LSUHealthNO15.png
Social Media Widgets
You can embed a social media widget on your web page using the documentation below. If you would like to add a widget we don't have documentation for below please send a request to Webmaster.
Steps to add a widget to your web page:
- Copy the desired widget code below and replace the source code text in bold with the appropriate information from your social media site
- Edit your webpage in the CMS and place the cursor in the location where you would like the widget to appear
- Select the "Source" button from the CMS editor as shown below
- Paste the widget code and save

- Sample Code to use official Twitter logo to link to Twitter page:
<a href="http://twitter.com/YOURTWITTERHANDLE/" target="_blank">
<img class="followicon" alt="Twitter"
src="/template2016/images/icons/social/twitter-blue.png">
</a>
- The resulting button will look like this:
-

- Sample Code to Copy into "Source" in CMS:
<a class="twitter-follow-button"
  href="https://twitter.com/YOURTWITTERHANDLE"
  data-size="large">
Follow @YOURTWITTERHANDLE</a>
- The resulting button will look like this:
- Follow @LSUHealthNO
Twitter Timeline
- Sample Code to Copy into "Source" in CMS:
<a class="twitter-timeline"
href="https://twitter.com/YOURTWITTERHANDLE"
data-width="250"
data-height="500">Tweets by YOURTWITTERHANDLE</a>
- The resulting timeline will look like this:
- Sample Code to use official Facebook logo to link to a Facebook page:
<a href="http://www.facebook.com/YOURFACEBOOKPAGE/"
target="_blank"><img class="followicon" alt="Facebook"
src="/template2016/images/icons/social/fb-blue.png">
</a>
- The resulting button will look like this:
-

Facebook Like Button
- Sample Code to Copy into "Source" in CMS:
<div class="fb-like"
data-href="https://www.facebook.com/YOURFACEBOOKPAGE"
data-layout="button"
data-action="like"
data-size="large"
data-show-faces="false"
data-share="false">
</div>
- The resulting button will look like this:
-
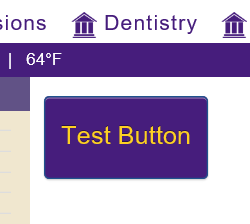
Create a Button
Steps to add a button to your page
1. In the CMS editor, type the text that should appear on the button and highlight it.
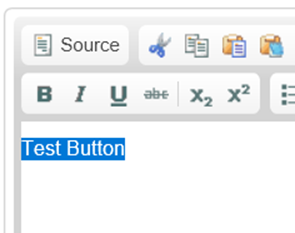
2. Click the link button (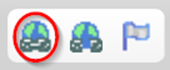 ) and enter the URL needed for the button. Click OK when done.
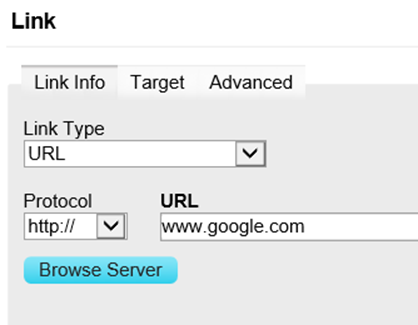
OR
If it is a page on the current site, click "Browse Server" and choose an aspx page from the list. Click OK when done.
3. While keeping the link highlighted, click the DIV button.
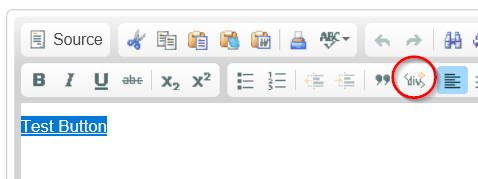
4. In the "Stylesheet Classes" box, enter "button" and click "OK"

5. Click "Submit" under the edit window and then "Stop Editing" to see the new button!